| –Ě–į–∑–≤–į–Ĺ–ł–Ķ | : | SHOP TIPS #180 Making Larger Dials for the Logan Lathe part 4 tubalcain |
| –ü—Ä–ĺ–ī–ĺ–Ľ–∂–ł—ā–Ķ–Ľ—Ć–Ĺ–ĺ—Ā—ā—Ć | : | 18.48 |
| –Ē–į—ā–į –Ņ—É–Ī–Ľ–ł–ļ–į—Ü–ł–ł | : | |
| –ü—Ä–ĺ—Ā–ľ–ĺ—ā—Ä–ĺ–≤ | : | 111¬†rb |


 |
That simple stamping jig is great! Comment from : John Doe |
 |
Mr Pete, I loved this series I have an old 14" cut-off blade that is 100T that I use in woodworking components At the time, it was not that expensive and I have since replaced with a new one I should work perfect for my project of replacing my dials on my lathebrAs always, thanks for sharing Comment from : Joe Whitney |
 |
This was fantastic to watch Comment from : Beatrute |
 |
Very nice job , looks awesome! Comment from : Jerry PEAL |
 |
I wish I had you for a shop teacher The world needs more of you Comment from : Isaac Carlson |
 |
By gad, Sir, I actually learned something! Thank you for this improvement for my Logan lathe and all the extra ideas and tips My eyesight ain't what it used to be and this is much appreciated Comment from : Drake Fallentine |
 |
Fantastic work as always, your channel is a treasure An absolute treasure, thank you so much for sharing your knowledge like this Comment from : stringmanipulator |
 |
Definately up there with the best of your video series, hit the spot with me, fantastic how you used a saw blade to index, it actually looked more positive indexing than a dividing head ring, great job on the dials I must say, my boxford has some sort of friction inside the dial, must be in two parts, not took it to bits yet, but yes, really enjoyed this set of vids, thanks Dave Comment from : Dave Harriman |
 |
Thank you This lesson in discipline, patience and skills Comment from : Newman Baker Jr |
 |
Thank you Mr Pete very good tips Comment from : Roger Deane |
 |
Hello from Buffalo! brbrCame back to watch this video once again, as I never get tired of learning some new, over again brbrMay I ask if this is the Logan Lathe you sold a little while ago?brbrBest wishes and good health to you and your family during the coming New Year!brbrRoy Comment from : Roy Lewis |
 |
Using that saw blade set-up as an indexer was an awesome idea Mr Pete I'm surprised though, that you didn't at least touch on the concept of direct & indirect reading dials Comment from : BBumpy |
 |
Mr Pete, I watched this some time ago and came back to look again at your stamping jig I am making the adjustment knob for an MLA boring and facing head and was trying to figure out what kind of jig I would need to make Happened to remember you doing this, so as I said here I am again to get a refresher Not the first time I have referred back to one of your videos and I am sure it won't be the last I'm so thankful to have them as a resource Comment from : greg wood |
 |
Many pearls in these old videos Thanks for sharing your knowledge Comment from : Timothy Daniel |
 |
You could use for resetting the dial a piece of brass a spring and a set screw, the spring could have enough pressure to stop the dial from moving on its own but it yould be reset without loosening anything Comment from : Eugen N |
 |
If you double or halve the number of graduations, couldn't you create a dial that measures cut diameter, or one that measures cut radius? Comment from : BedsitBob |
 |
They don’t make them like you anymore,keep the vids coming to us in England Comment from : Lee Dale |
 |
Incredible professionalism an inspiration to all Comment from : Stan Brown |
 |
excellent video and method thanks so much Comment from : commando340 |
 |
Great videos Comment from : Neil Hansen |
 |
Brilliant! I have to make a compound dial, so this video is excellent Comment from : Steve Mm |
 |
Huge number of comments I love the 4 part series I searched for a long time to find your video on how to make a new dial My Logan has very corroded compound and cross feed dials and both are 15/16" diameter I like your jigs but will have to borrow some time on a mill to do that work You explained the number stamping well, but did like an early post about keeping them radially aligned Such a very very well done video series I am now your age when you made the vids :-) Comment from : BillL |
 |
OH MAN!!! Your video is perfect for me, I have a old Monarch model A lathe made in 1916 It suffers from age and probably some lame operators too I've been wanting to replace the graduated dials and making them abit larger would (as you pointed out) easier to read I too was thinking of trying to find a gear with proper number of teeth, but haven't been very successful I'll try your idea, both with indexing method and stamping My hope is now to be as successful as you were! THX Again!!! Comment from : m551tanker |
 |
Mr Pete very interesting, I have been thinking of doing something similar for my lathe but seeing how much work was involved I think I will purchase one on eBay Thanks for your videos from UK Comment from : Andy Pandy |
 |
Lol, by chance are you selling the prototype dial? Comment from : 351 Ranger |
 |
I thank you and praise God for the work you do to educate the machinist art May God bless you for your effort Comment from : Proverb House |
 |
Wonderful video, thank you! brPS: You were right I was dying to see how you would index the part on the lathe but would not skip ahead for fear of missing something important A saw blade eh? How ingenious! Comment from : Making Kindling |
 |
Great video, I enjoyed every minute of it! brJust got my hand on an old machine and I will try to make new dials the way you have Comment from : Peer Jensen |
 |
Thank you for the inspiration I adapted this process to by lathe mill combo to make up a couple of dials for a graver sharpening jig that I'm building My dial was for 360 degree so I used my cnc mill to make up a custom 72 tooth saw blade out of 1/8" abs plastic All I have left to do is the stamping Comment from : Old Ash |
 |
great video i will be using what you taught to make some dials for my simat lathe Comment from : Ga Gas Man Cave |
 |
what is clicking ? mrpete222 Comment from : MrKidkiller159 |
 |
Very nice job Love the saw blade I have loved all the videos concerning restoration of lathes, as friend of mine, his dad passed on and left him his lathe, which was in a heck of a mess it has to be completely rebuilt He has donated the lathe to me The one thing that I do know is that the ways are in excellent condition ( Thank goodness) The rest is dirt, chips grease ,oil, RUST, I think I will do a serious for youtube Comment from : Chris Gray |
 |
Don't worry about the length Of your videos More to enjoy Thanks! Comment from : cogpastorc |
 |
Excelent workmanship mr Pete Comment from : Jay Robertson |
 |
While I don't own a lathe and likely won't be needing to make dials I'm sure I've learned something from this video that I will use at a later date Comment from : Nuts Mc Flurry |
 |
Hi, brI have a Logan 200 with play in the carriage feed handle Have you done a video about putting a bushing in the apron to correct the handle slop I enjoy your work, please forgive me if the terminology is incorrect Comment from : Larry Dakin |
 |
So nice! Comment from : Dennis Henriksen |
 |
Thank you MrPete I really need to make one for my lathe,i was wondering how make it and finally i came across your videothis will be the best and easiest way to do this in home shop You are doing great job Thanks for all the time and effort you spend here brMK29 Comment from : Mathan Kumar |
 |
Can you use the cross slide dial you replaced for the compound dial? I imagine you'd need a bushing or something but it'd be larger and you wouldn't have to go through making a whole new dial 17:36 Comment from : Bobby Vincent |
 |
Mr Pete, I just found this website from the UK, ( homewscouk/page315html), showing Harald Hayes design of an automatic counter for scribing or lining the larger dial of the lead screws which you show being done manually 2 find a way to engrave the numbers instead of stamping them on the Dial 3 How do you give polished metal a satin finnish? Comment from : Douglas Roger DEXHEIMER |
 |
Excellent explanationbrI was looking for a solution to my project, and I found it herebrThank you for sharingbrGreetings from Brazil Comment from : Amilton Jr |
 |
To all those making improvement suggestions, it's always easy to tell someone how to improve something once THEY have designed it and made it Great job in designing your jig I remember seeing the dial you stamped before you made the jig You keep inspiring us to do things, and you will be inspiring others through your videos long after we are gone Comment from : Mature Patriot Machining |
 |
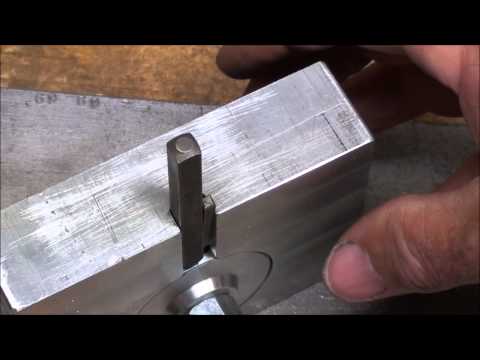
By my calculations, I am coming up with you stamping the number pairs 1/8" apart If that is correct, and you would have made your slot for the stamp 1/4" wide, you could have centered the tick for the 0 and stamped it For the two digit pairs, you could put a 3/16" shim on the left side of the slot, aligned the tick with the edge of the shim, stamped the non zero digit, put the shim on the right, align the tick, and stamp the 0 You have twice the number of alignments, but the stamp would be going straight into the dial instead of at a slight angle and you would not have to hold a shim in with the stamp while stamping Comment from : CPUDOCTHE1 |
 |
Awesome jig for stamping the numbers! Comment from : Brandon Tscheschlog |
 |
My lathe is a Punjap, which has graduations going 125 in one full rotation Do i have to find a 125 tooth saw blade? A larger wheel sure would be nice Comment from : Mike Keele |
 |
Thanks for great information on machining these dials just bought old south bend 9a and been restoring it and doing machine work on it Comment from : Andrew cain |
 |
Wow Pete this is amazing work loved how it turned out Looks very professional my friend ūüĎćūüĎćūüĎćūüĎć Comment from : Mark Grevatt |
 |
i think if you scribed two refference lines for the dail lines on the slot in the jig (two lines to the left and the right of the center line on the slot apart the same distance as the numbers ) you couldve kept the slot in the jig perfectly centered on the dail to fit the stamps and hit the dail dead straight down on every number ou wouldve had to turn the dail in the jig for every stamp,,,,,,,,, never mind the comment below tells the same Comment from : watahyahknow |
 |
Would it work to use some sort of press to imprint the numbers with some sort of press rather than a hammer? Perhaps an arbor press or something with a distance readout or DRO like your Bridgeport or a dial like your lathe cross feed or carriage? I guess it would not damage your machine Certainly feel would tell you if you were using too much force marking a test piece and you could determine how many thou depth a proper mark would take You could centerline the jig to measure how many marks to turn to get proper number spacing, and make the grove in the jig the width of the number die On the other hand, the job you did was great! Do you need to paint the dial with clear paint or tape to preserve it? Alumininum can get pretty ugly with age Comment from : Toby W |
 |
Great series Mr Pete! I came up with a similar scribing technique for straight-knurling knobs, because I don't have a knurling tool Since I had no way to index, the marks are unevenly spaced, although it is functional Your saw blade technique has got me thinking about making an index plate with holes, and a spring loaded detent ball to do indexing! Comment from : John Robertson |
 |
Excelent Mr Pete , so in depth those who view should be impressed , really enjoy all your videos , keep up the good work regards Pete Comment from : Pete Scales |
 |
Awesome! Comment from : hg2 |
 |
Lateral thinking - I love it! You're my kind of guy I've been wondering how to do this, without the benefit of owning a dividing head or even a mill So you won't be the only one doing it this way Thanks for sharing the idea, MrPete Comment from : Beachcomber Bob |
 |
I loved this video! Thank You so much! Comment from : George Crutchfield |
 |
I sat here and watched knowing full well you would explain each step, yet still I found myself saying "how the hell is he going to do that?" Well, as usual I am in awe of your ability to overcome one obstacle after another to get the job done Thank you for putting up these videos and teaching us novices Comment from : Joes Auto Electric |
 |
Mr Tubalcain marvellous proyect thank you Comment from : joseph m cortes |
 |
Great video sir, thanks for sharing a God given talent God bless you sir Comment from : jewel cenon |
 |
BRILLIANT!! As a gunsmith for over 30 years, I’ve made many index plates for projects, but would have never thought of using a saw blade You’ve opened a whole new world of thought Bravo!! Comment from : David Morgan |
 |
As good as it gets Thank you Comment from : Ricopolico |
 |
Hello Mr Pete, I have always wanted a lathe so I purchased a Old 9" Southbend Well I am no spring chicken and my sight is kind of getting blurry so I followed your video and made me a set of dials for my old lathe I even used the saw blade to scribe the lines :) This modification really makes life easy Thank you for sharing your knowledge Comment from : R H |
 |
I just made some dials using this same indexing method and the divisions look really nice For the numbering, I made up a tool post mounted jig to do the job As you commented, the numbers are hitting into a curved surface so I did a calculation on a typical 2" (508mm) dial and a 3mm stamped character With the stamp center just touching the curve of the dial, each side edge of the character is only about 001" from the dial surface (hope that's right) - not so much as one would think! brThanks for the time you put into this video Comment from : Alan Somerfield |
 |
Great video has anyone ever told you that your voice sounds allot like "Jimmy Stewart" the movie actor?? Comment from : Nicholas T |
 |
beautiful, thanks for sharing! Comment from : quakesin |
 |
That looks unbelievable! Fantastic work! Comment from : ExportedAfrican |
 |
wow !¬† This is a great video !¬† I learned a lot !!¬† I would be interested to learn how to make such witings on a staright steel bar for a Tang Sights, VernierThank you ! Comment from : Etienne Br√Ľl√© |
 |
Hello Mr Pete, and a very good day to you, your a fantastic teacher thank you very much for your videos and unique style and approach to your projects br*brI will be making some new dials for my old lathe and you have made the task so much easier, keep up the good work projects and inspiring videos br*brBest regards, Trevor from England Comment from : Tinker |
 |
Liked it so much I made a set Comment from : Michael Peterson |
 |
Nice video If I did this, I would probably only stamp 0, 1, 2, 3 instead of 0, 10, 20, 30 since the zero is implied and I'm also quite lazy Comment from : Scott Paul |
 |
I really enjoyed these series of videos I have a PM1236 and want to make larger dials to make it easier to see when making fine adjustments between lines Comment from : CKontheBay |
 |
Great video I now know who to increase the dial size for my Atlas lathe I just get so much from your videosbrThanksbrSo much Comment from : Big Bill at Iron Garage |
 |
I will have to use this to make dials for my IXL lathe restoration Comment from : stanley carter |
 |
Another great video Thanks Comment from : Uncle Red |
 |
Loved the video! Using the saw blade as your index fixture was a great idea I don't have a lathe but I sure want one Have learned a lot watching your videos I think this is one of your best How To videos so far Thanks for all you do here Comment from : happyfoot2166 |
 |
Excellent work! Comment from : Mr Ubiquitous |
 |
I have a Logan/PowerKraft I have the hardest time seeing the dials I'm gonna make some new ones Thanks tubalcain I love your videos Keep it up Comment from : fonzzy08 |
 |
Thank you so much for doing this entirely on the lathe I don't have a mill I smiled through all four videos and learned so much from this The dials on the Atlas need work Comment from : TrailBusterBrute1 |
 |
Hi I would like to know if by way of dial indicator if the dial is accurate for each turn or graduation I appreciate the tutorial as I have learned some thing new Comment from : Outback Enduro |
 |
Excellent series on this project, Thanks Tubal! Comment from : MrJoeGarner |
 |
Pure genius Comment from : 3cl1 |
 |
very nice job on the new logan lathe dials they really turned out very well i would be proud if i made those dial as nice as you did thanks tubalcain Comment from : Jamie Buckley |
 |
THE GREAT VIDEOS ARE VERY EDUCATIONAL AND PRACTICALbrGREETINGS FROM MEXICO CAMPECHE Comment from : Alejandro Richaud |
 |
Thank you for information It is admirable to his teaching and dedication to detailbrAlways teaches that we have the resources, just watch what's right in front of usbrCongratulations Comment from : Marcos Amoroso |
 |
You sir, are a craftsman Comment from : Ogma ő¶ DJ & Musician ő¶ |
 |
Awesome series to show how it's done, I really liked the idea of using a sawblade  for the indexing, I might have to copy that idea sometimebrReally enjoy these video's you have on here Comment from : AcidStyle79 |
 |
Regardless, tis a thing of beauty It looked like it grew like that Thanks for the tips (as always) Comment from : strongandco |
 |
Great set of vids MrPete I am using these to repair an old Enco lathe I have had for several years Mine was a basket case and the crossfeed dial was/is missing I will make some parts to fit this lathe since I can not buy parts for it any longer These vids really help me figure it out Thank you very much Comment from : Rick Wagner |
 |
 Thanks to your tips I'm redoing my Atlas Lathe dials  Would have never tried to do it without your videos  Wish I could have been in your class as a youth  Keep up the good work! Comment from : shortribs11 |
 |
–í—Ā–Ķ–≥–ī–į –Ī—č–Ľ–ĺ –ł–Ĺ—ā–Ķ—Ä–Ķ—Ā–Ĺ–ĺ –ļ–į–ļ —ć—ā–ĺ –ī–Ķ–Ľ–į–Ķ—ā—Ā—Ź –°–Ņ–į—Ā–ł–Ī–ĺ –∑–į –≤–ł–ī–Ķ–ĺ Comment from : –ź–Ĺ–ī—Ä–Ķ–Ļ –©—Ď–≥–ĺ–Ľ–Ķ–≤ |
 |
I sincerely enjoyed this excellent video and learned a lot  Thank you so much Comment from : Fred Marino |
 |
SHOP TIPS #177 Making Larger Dials for the Logan Lathe part 1 tubalcain –†—ē–°‚Äö : mrpete222 Download Full Episodes | The Most Watched videos of all time |
 |
SHOP TIPS #179 Larger Dials for the Logan Lathe part 3 tubalcain –†—ē–°‚Äö : mrpete222 Download Full Episodes | The Most Watched videos of all time |
 |
Shop Tips #174 Making Daubers on Logan Turret Lathe pt 2 tubalcain –†—ē–°‚Äö : mrpete222 Download Full Episodes | The Most Watched videos of all time |
 |
SHOP TIPS #297 Pt 2 Making a Belt Guard for Logan Lathe tubalcain –†—ē–°‚Äö : mrpete222 Download Full Episodes | The Most Watched videos of all time |
 |
MACHINE SHOP TIPS #122 THREE WAYS TO A RADIUS - Logan Lathe-Part 2 tubalcain –†—ē–°‚Äö : mrpete222 Download Full Episodes | The Most Watched videos of all time |
 |
MACHINE SHOP TIPS #131 Repairing a Logan Lathe Gear Box PART 2 tubalcain –†—ē–°‚Äö : mrpete222 Download Full Episodes | The Most Watched videos of all time |
 |
Make Extra Large Atlas Lathe Dials pt 2 TIPS #432 tubalcain –†—ē–°‚Äö : mrpete222 Download Full Episodes | The Most Watched videos of all time |
 |
Extra Large Atlas Lathe Dials pt 1 TIPS #431 tubalcain –†—ē–°‚Äö : mrpete222 Download Full Episodes | The Most Watched videos of all time |
 |
MACHINE SHOP TIPS #159 Making a Lathe Handwheel part 2 tubalcain –†—ē–°‚Äö : mrpete222 Download Full Episodes | The Most Watched videos of all time |
 |
THREADING on the CLAUSING LATHE atlas logan part 2 tubalcain –†—ē–°‚Äö : mrpete222 Download Full Episodes | The Most Watched videos of all time |